

How To Draw Clothing On A Body
When I first drew clothes on a graphic symbol, information technology was hard. After knowing some important tips, I understood how to draw folds in apparel.
Once you lot go a grip on these nuts, you are skillful to go for ballsy drawings. My communication would be to ever first with the human torso, then it becomes a lot easier to describe wrinkles in different types of clothing.
The other tips I am sharing with you volition help you draw jeans, sweaters, shirts and know what the key ingredient is to cartoon dresses.
Take hold of your sketch pen, your drawing pad, and hop on with me.
Other related posts to help you draw:
- x Tips for Drawing People for Beginners
- 21 Bright Tips to Exercise Gesture Cartoon
- Peak 10 Tips to Cartoon Backgrounds Like a Pro
Learn the human beefcake in club to depict clothes
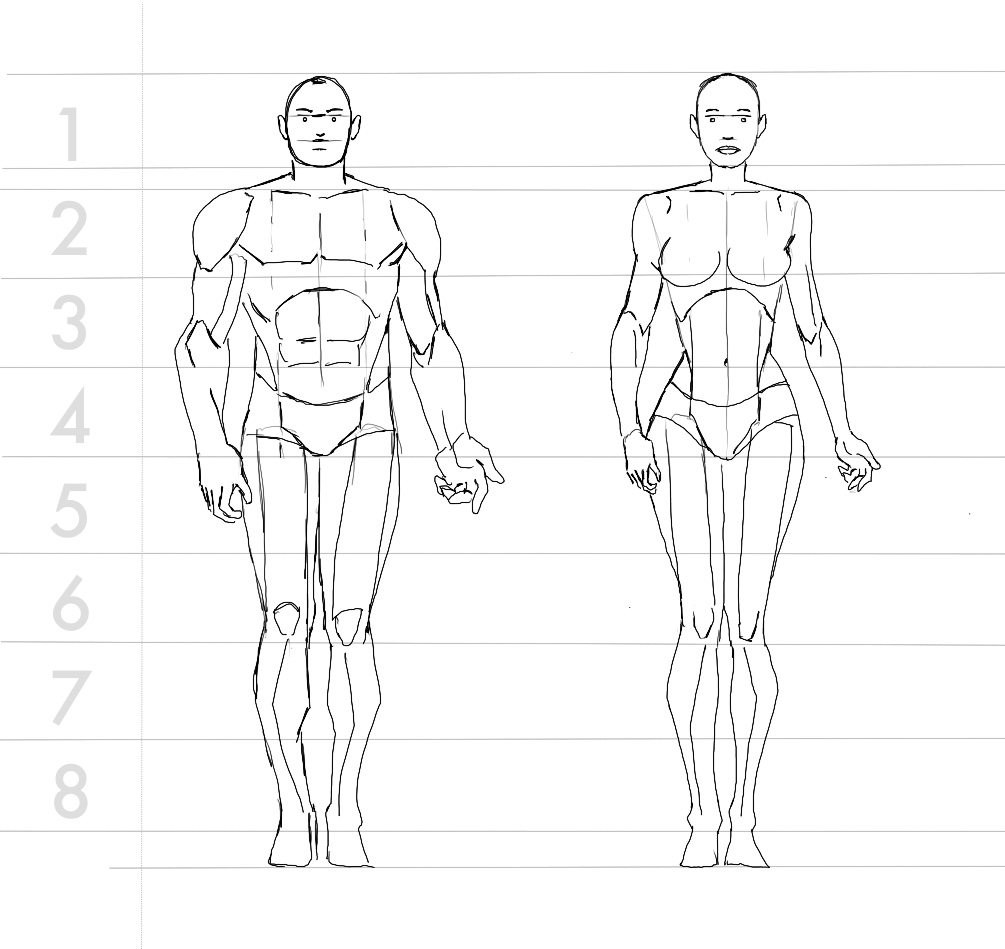
The outset and essential tip is to become into the anatomy before cartoon wearing apparel.
It is vital to learn securely about the homo body's anatomy.
Know how to draw a trunk with its actual shape. Whether yous are cartoon from the listen, real-life effigy, or reference picture, become the shapes right.
Yes, y'all might have seen those videos of artists making sketches with unusual bodies. Indeed, they look so beautiful.
Nonetheless, they are just sketches in their budding stages. When information technology later comes to illustrators, they recreate the drawing with proper bodies with proper proportions.
You can learn anatomy from my free drawing course and/or from these free books on cartoon.
Use stylization to aid yous describe folds
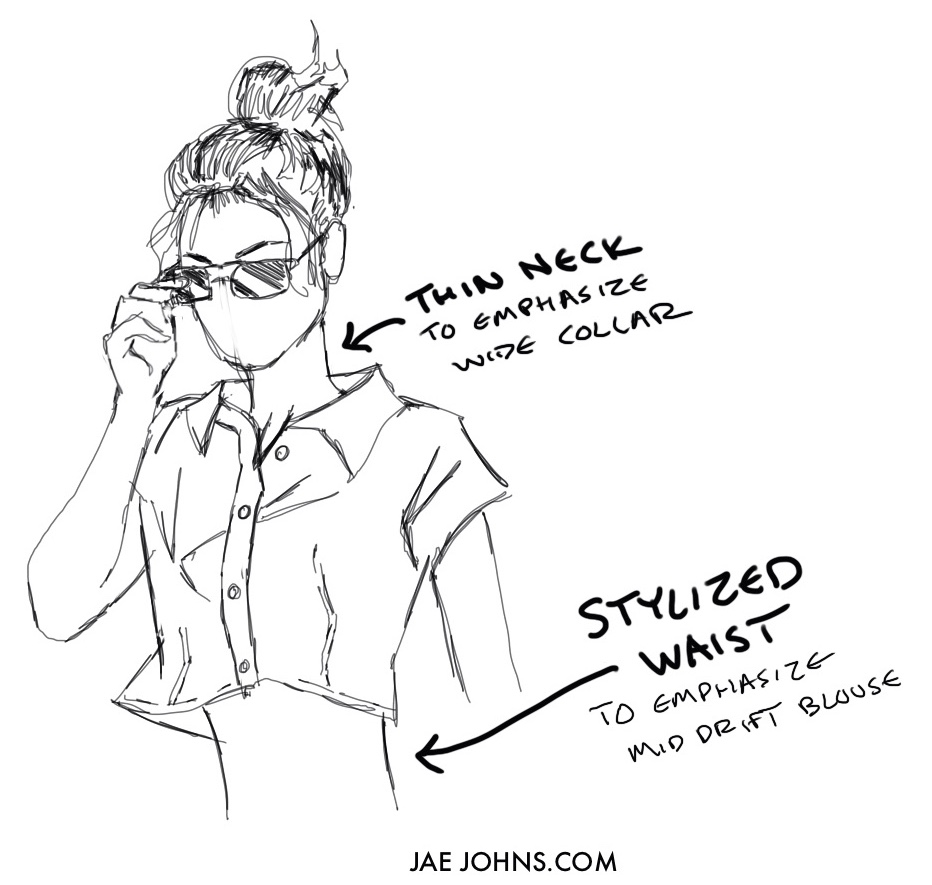
At present, I have an actress tip for drawing apparel. I recommend you to raise the wearing apparel' features in drawing through stylization. Again, this is a value addition tip.
After yous are washed with the anatomy, information technology is time to let your hands bladder. Every slice of clothing has some features, which make them stand up out. Features or elements make a cartoon what it is.
That is why information technology is very vital to highlight them through your drawing. You can stylize your apparel drawing to achieve optimization. This brings more focus to particular elements of the drawing.
Feel complimentary to exaggerate the facial and figure features in the cartoon to accentuate the eminent elements of the cartoon. Make information technology in a fashion your drawing stands out.
For example, you lot are drawing a figure wearing a ball gown as you know that ball gowns are huge and flow out along the curves. Now, if y'all would draw a large waist, the dress would not stand out.
Instead, if yous draw a tiny waist, there would be more flow along the curves.
This fashion your clothes' design would be more prominent. Your stylization would tell your story or inspiration behind your drawing.
In the simplest terms, draw the style cartoons are drawn. Remember Cinderella? She had a tiny waist to show the outflowing feature of her large wedding gown.
You can know more about stylization in drawing through this video.
Tip on how to draw a jacket
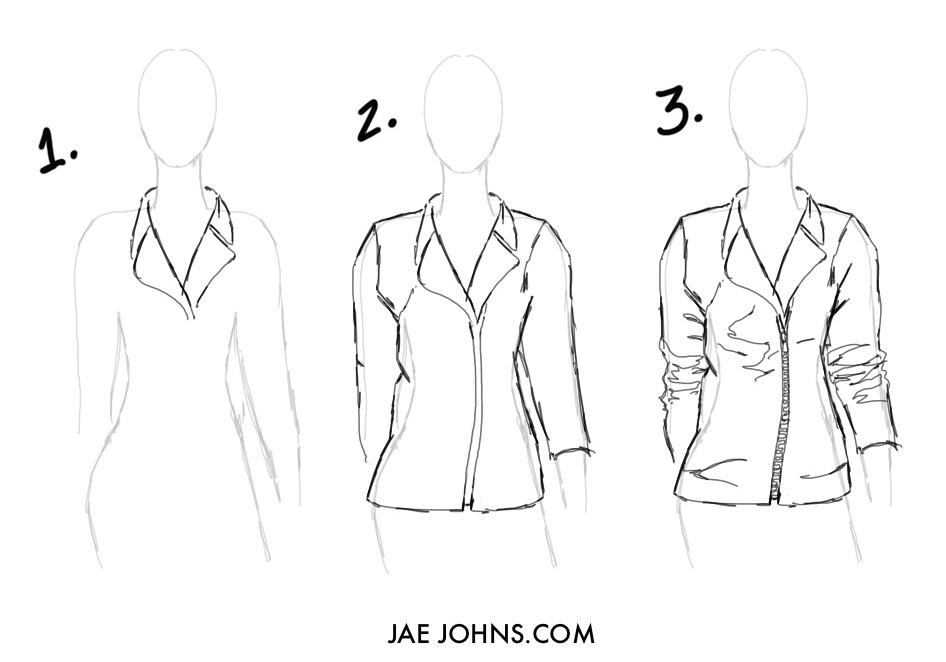
A jacket is one of the basic yet extraordinary clothing items. Information technology tin be worn whether you are at work or fifty-fifty on a red carpet. That is why artists must know how to draw a jacket.
Now, a jacket can take diverse cuts, fabrics, and elements. It is fun to draw it according to your dream blueprint. Nevertheless, the nigh basic design ever stands out and is famous in jackets.
Although it is complicated, I would make sure you lot get it through the almost convenient and straightforward way. Let the states become to work.
For this, I would become for a female jacket.
- Offset, get to my outset tip on anatomy. Brand certain to draw information technology on the torso centerline.
- Next up, describe the 5-shaped neckline. Starting time the neckline from the shoulders and end on the button. To raise this neckline, describe a horizontal V for the collar and lapel. You can experiment with various designs when drawing collars and lapels.
- Next, brand the outlines. At this stage, you tin experiment with silhouettes and proportions. Make certain not to make it too tight and keep the beefcake in mind.
- Now, draw some folds. This would give the jacket a more defined and realistic look. Draw the wrinkles around the elbow and waist.
Y'all can draw some boosted details. Depict the hems, buttons, emblems, or princess hems. You can decorate the jacket as you lot wish. Call up, this is the most basic way. You lot can bring in variations.
Here is a bonus video virtually jacket cartoon.
How to draw sweater folds
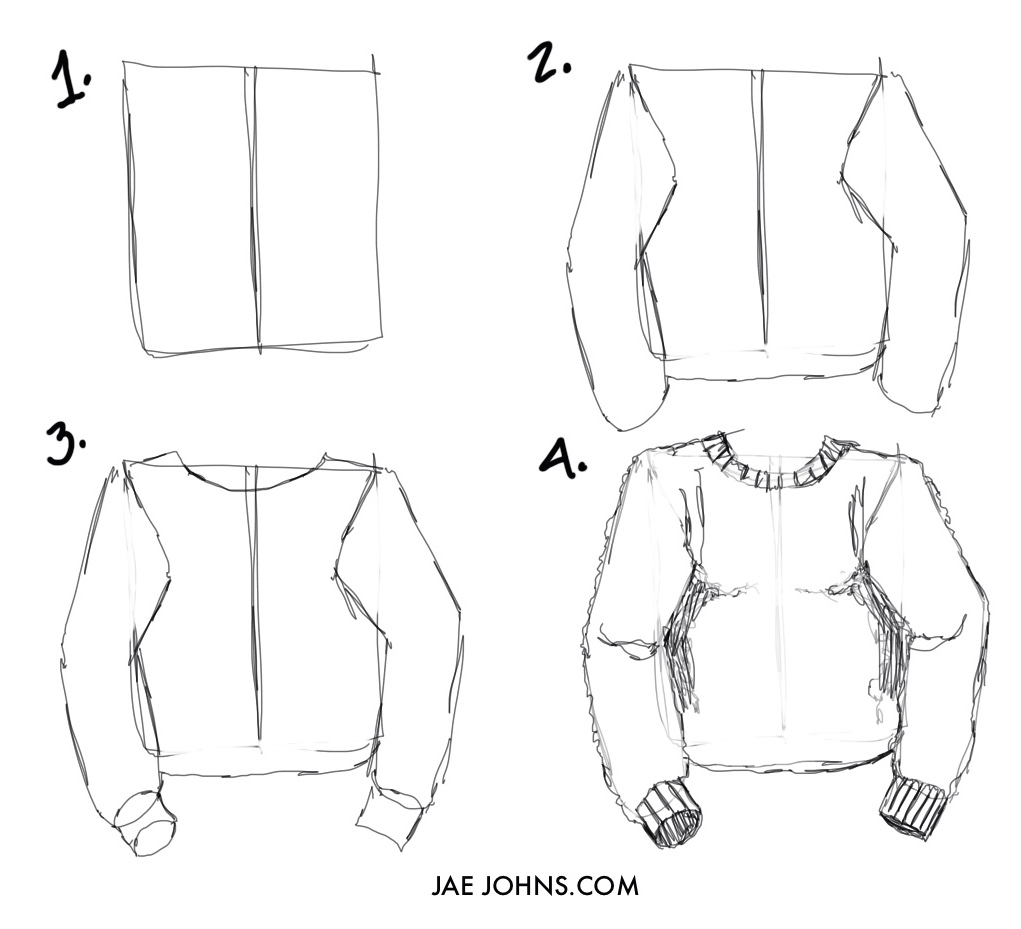
Sweaters are absurd and warm. Every bit an illustrator, learning to depict a sweater is essential besides. You'll desire to depict a sweater finer by mastering how to depict the softness and knitting of wool.
This is a bit tricky and needs do. Still, I am going to share some tips with you lot. That would surely aid you to go your grip on drawing sweaters.
Sweaters come in all shapes and sizes. They are varied in patterns and kitting too.
Permit me tell you how to describe a sweater.
Basic sweaters are loose and do not stick to your torso.
First, start with the sweater base.
- Kickoff with a rectangular drawing and make a centerline.
- From the top corners of the rectangle, draw two bent lines for the sleeves.
- Next, draw the openings. For this, draw bend lines at the endings of sleeves, hem, and neckline. Add the curve parallels for the ribbing. You can create draw designs on the ribbings as well.
- Afterwards all this, draw the sweater outlines. Describe it in an oversized manner. Could you give information technology a wiggly bear upon? Make sure that the cartoon is not sharp and well-baked. Add together some wrinkles and folds.
Do not forget to add the knitting details. Later all, they make a sweater. Make sure the knitting follows the direction of the sleeves. Add some holes also. There you accept it—a perfect sweater.
I accept a cool sweater drawing video for you here.
Larn the difference of drawing fabrics and texture when drawing wearable folds
Apart from the basic folds, we need to work on an enhanced form of folds, distinguishing between fabrics and textures in a drawing.
Here comes a tip I cannot stress upon much. This might wait hard at a beginner's stage. However, if you master the ability to differentiate between fabrics and textures in drawing, you lot are expert to go.
It is when an artist can depict the weight and texture of any fabric through the drawing. This shows the attention to item and mastery to highlight information technology. I tin can tell you that it is tricky and requires a lot of practice.
Now, if the fabric is chiffon, voile, or low-cal silk, you can show it through the straight or airy flowy movement. Draw a dress that is being blown away from the wind. For a realistic look, color information technology with low-cal shadings.
Add some white lines. Make sure to depict wrinkles in the direction of wind and dress blowing.
On the other hand, if the fabric is heavy similar velvet, you can describe through a sturdy move of the effigy. Cartoon a fabric largely depends on the position of your figure.
Draw the heavy fabric in a directly and still manner. For a realistic look, add dark colors. For velvet, double shade the drawing.
On the other hand, you tin show a rigid figure for formal suits. The way it is drawn, how it is draped, or the way it is colored gives an thought well-nigh the fabric's nature. In addition, you can illustrate the textures in fabrics also. Work with color shadowing.
This requires the usage of detailed or sharp pens. Moreover, it requires practice with an unwavering focus. Exercise not forget to smoothen the color.
Through this video, yous tin learn to exercise this technique.
Draw wrinkles at compression points
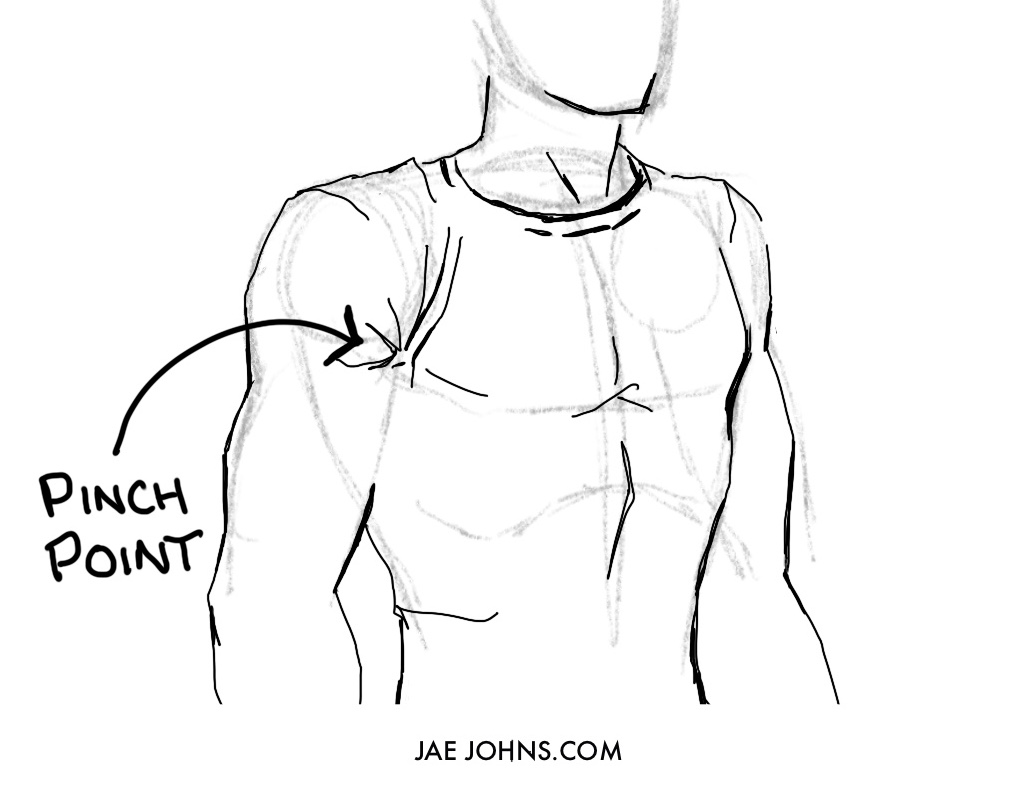
The areas where wrinkles occur are ever at pinch points.
Pinch points are areas where the article of clothing naturally bunches together.
The areas that are pinch points are the post-obit:
- Shoulder
- Armpit
- Elbow
- Crotch
- Knees
Placing wrinkles at the pinch points helps prevent your drawing from looking like it has wrinkles all over the place without whatsoever sort of reason to it.
Wrinkles will then radiate outward from the pinch point.
Sketch dress better past learning where clothing seams are placed
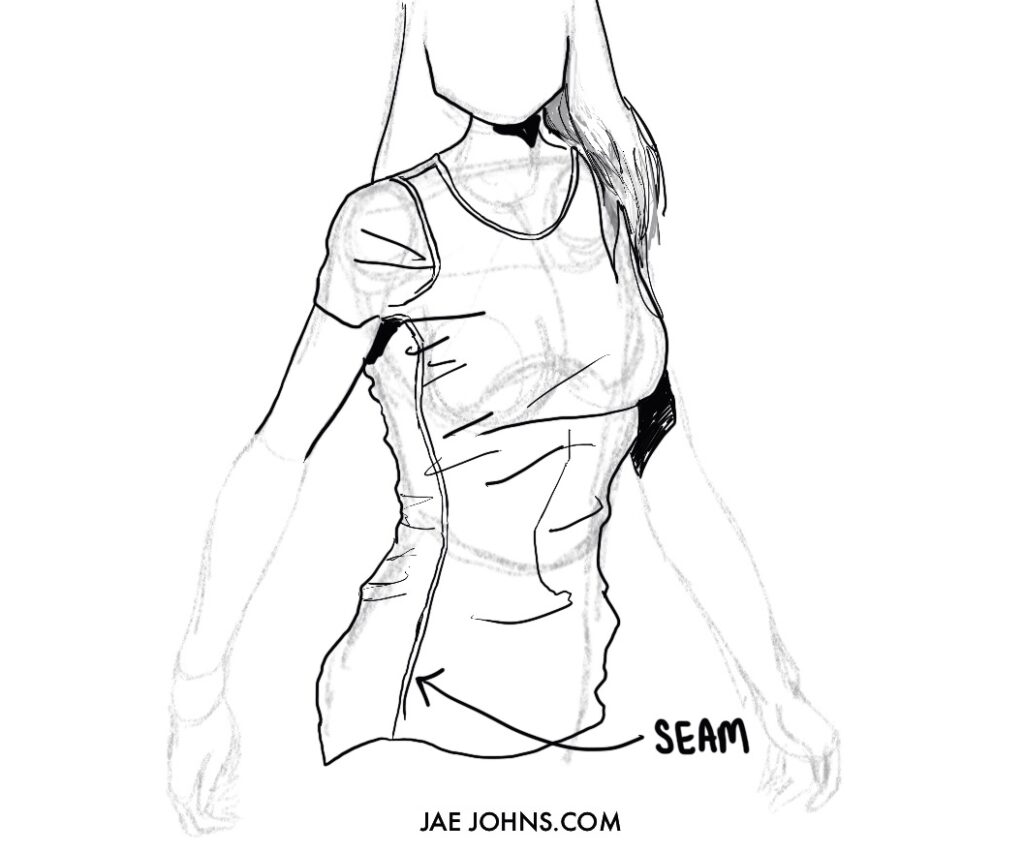
I great tip to sketch clothes is to larn where the seams autumn on your clothing.
Past learning where seams period naturally in clothing, it volition brand your drawings stand out.
It can be extremely like shooting fish in a barrel to know where the seams are. All you have to do is to look at your shirt or pants.
When you know where to sketch in article of clothing seams, your folds and wrinkles look realistic.
Seams assist show the structure of the form of the trunk and also add visual involvement to the design of the clothing.
Use a pipe fold to depict folds in a apparel
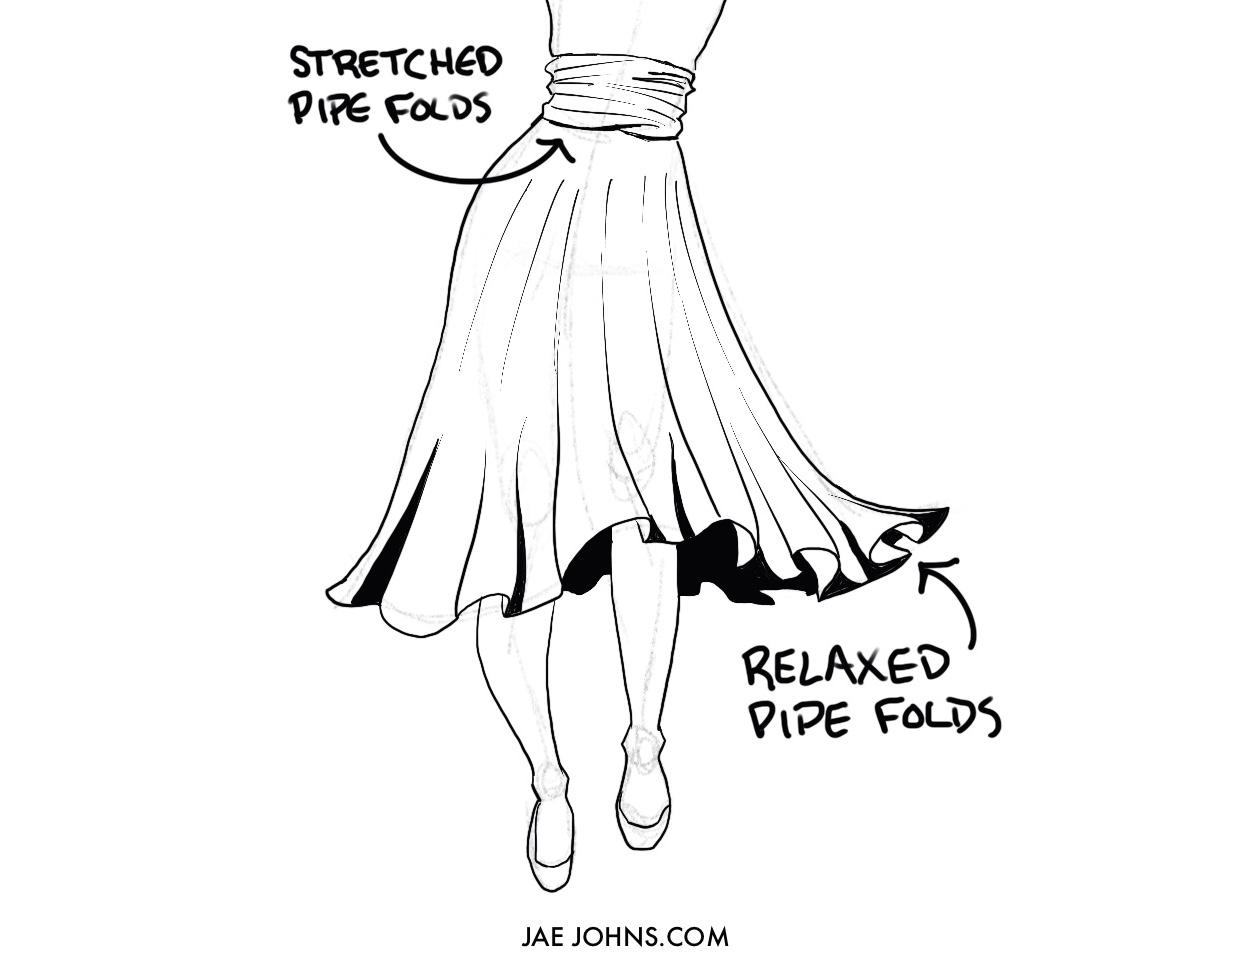
When you draw a dress, the long pall of the cloth folds a certain way. The folds tend to be long and cascading and learning how to draw piping folds volition achieve this.
Drawing a dress with a pipe fold is an piece of cake tip a beginner can do that will accept instant results.
Pipage folds are a fold that is shaped in a cylinder-similar or cone-like appearance.
These types of folds show dandy depth and book of wear, which is perfect for sketching a dress.
Two types of pipe folds:
- Relaxed pipe folds – these type of folds are cylinder like and are very normally seen on window drape
- Stretched pipage folds – these are usually thinner and string-like folds because they are folds that are pulled from i stop to the other end.
Tip on how to draw a shirt
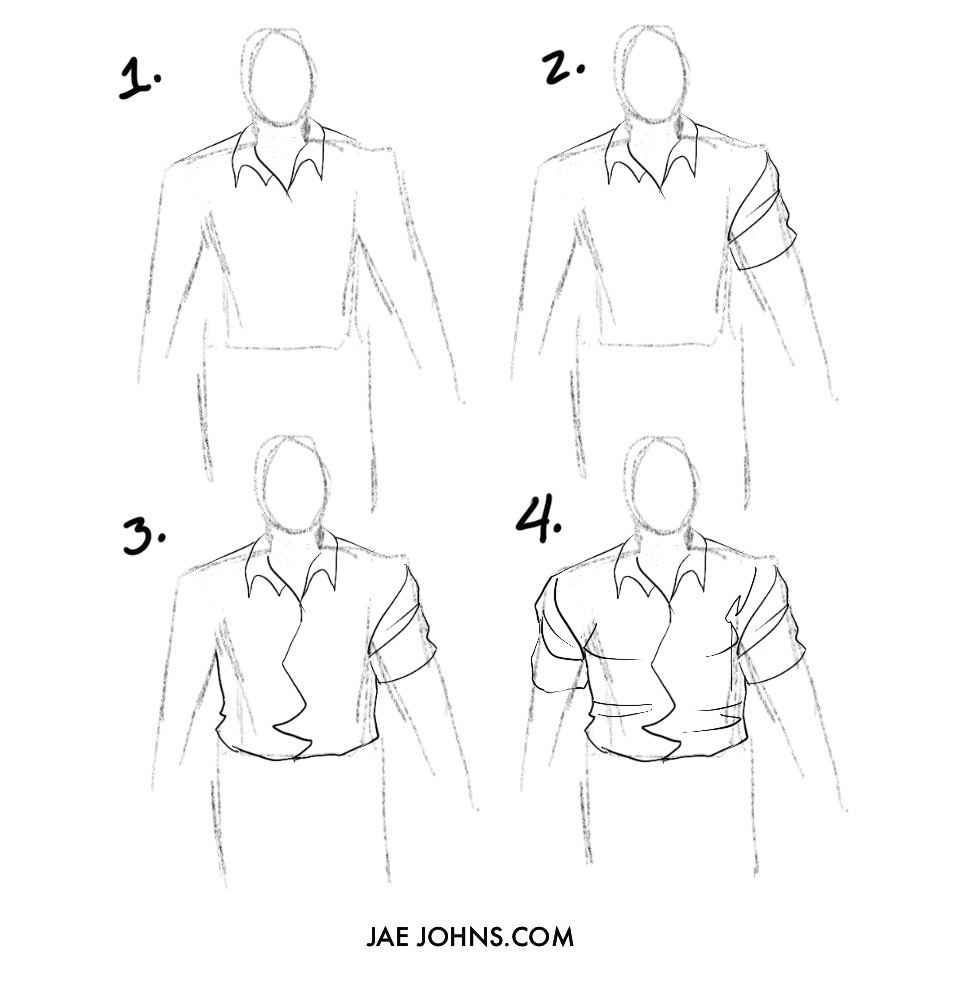
A tip on how to draw shirts is to approximate the folds instead of meticulously drawing each fold or wrinkles like it is in real life.
Sometimes when you try to draw things exactly how they appear in real life, your drawing looks to rigid or stiff.
To approximate folds, y'all tin try to simplify folds equally i line.
Here's how you can depict folds in a shirt:
- Make sure y'all have a sketch of the anatomy first. Remember that when drawing folds or wrinkles, you want to pay attention to the underlying beefcake.
- Commencement with the highest point on the shoulder and draw a curve in to the armpit, side by side reverse the line outward until y'all become to around the terminate of the shoulder muscle, then curve a little chip inward.
- From the center of the collar, describe a line that goes downward then zigzags every bit it gets to the waist.
- Add in some additional lines for the shirt wrinkles around the abdomen area and below the chest.
Tip on shading the clothes
Shadows and highlighting enhance your clothes drawing. They give them a more realistic bear on. Shadows effectually folds vary according to the thickness of the material.
Now when you are drawing folds, you must use a combination of soft and hard edges. If the wear were smooth or lite, it would reflect more low-cal and requite a brighter highlighted outlook. Brand sure to shadow in the dark areas of your drawing.
Through this video, you tin can learn to shade like a pro.
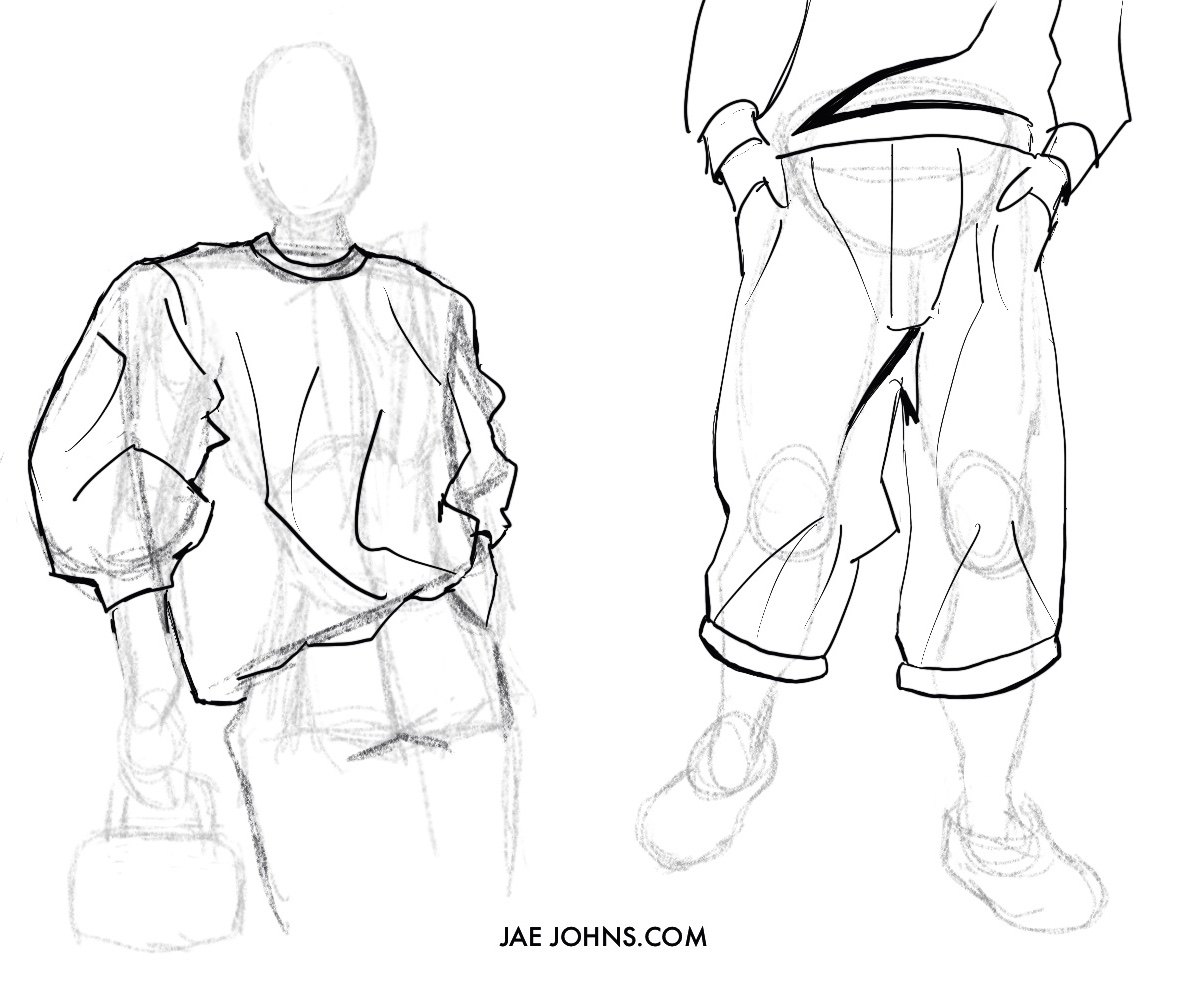
Tip on drawing pant folds
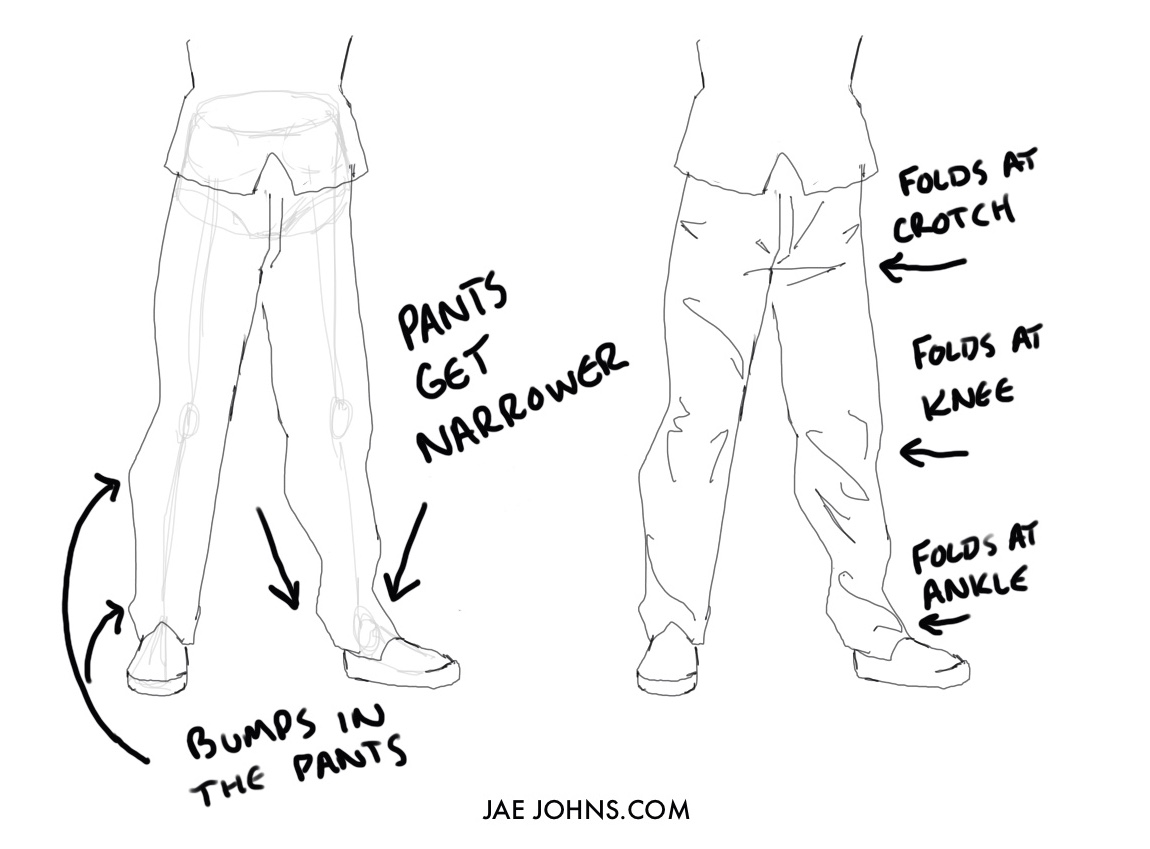
Yous would accept seen different variations of pants. Without whatsoever doubt, they are the essential clothing items and the most stylish ones. The fabric of the pants is supported at the waist.
When you lot draw the lower part of the pants, they are narrowed down. When you are drawing pants, call up to add bumps to pants. Bumps bear witness their origin and book. Now, when you are drawing pants from the back, add folds under the hips. This would besides lead to adding folds around the knees.
For a improve approach, watch this video.
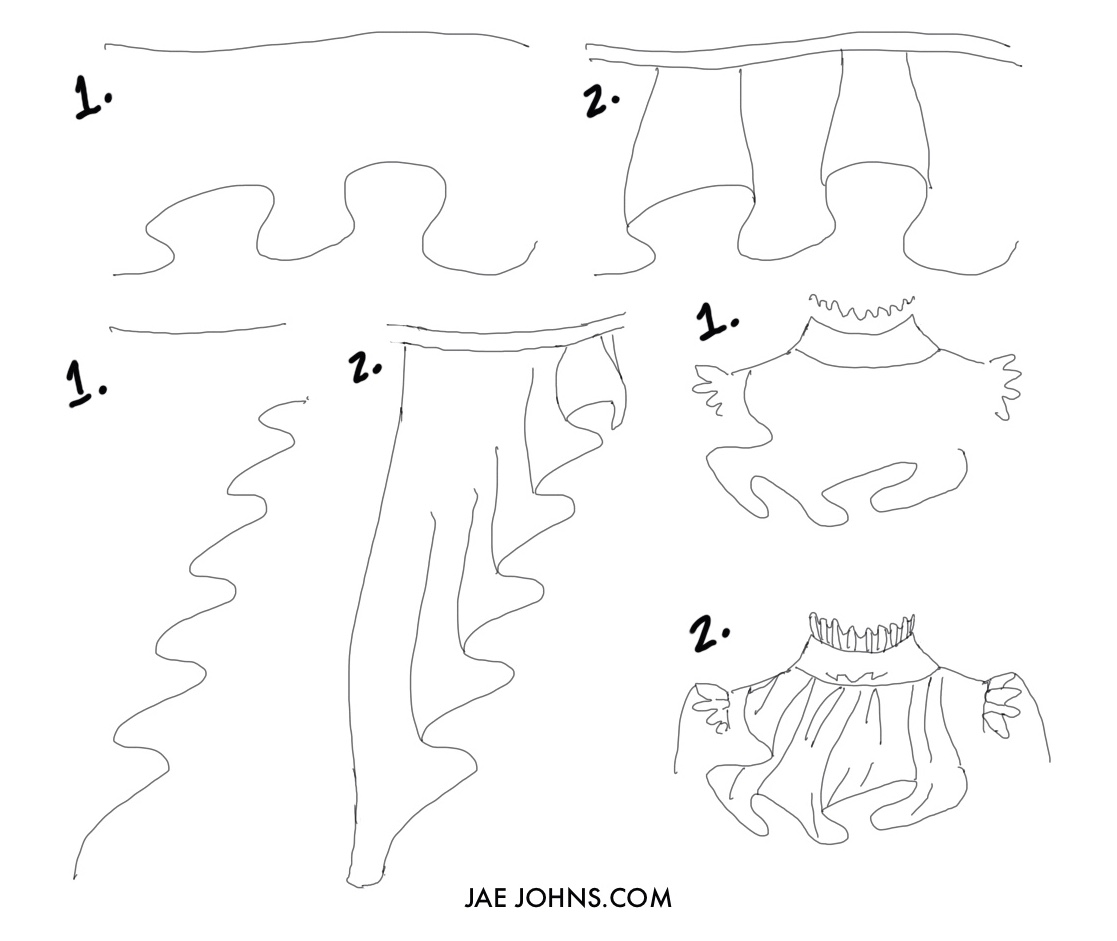
How to draw baggy clothes tip
The essential tip on drawing baggy clothes is to think of the basic shape. There are two bones shapes you need to describe when drawing a amorphous shirt or baggy pants.
For the shirt, you lot will draw a foursquare. For the pants, you volition depict a rectangle.
When cartoon a loose shirt or loose pants, it's of import to describe the body of the character first, then draw a foursquare or rectangle that is wider than the volume of the body.
How to draw a amorphous shirt
- Like e'er, start with your beefcake
- Draw a large square for the shirt
- Depict a large football shape with the ends cut off for the sleeves
- Add together in some loose wrinkles and folds around compression points (these are mentioned earlier)
How to depict baggy pants
- Like always, starting time with your anatomy
- Draw a large rectangle for the jeans or pants
- Normal pants taper as information technology gets to the ankles, only when you draw loose pants yous don't want to taper them.
- Add in some loose wrinkles and folds around pinch points (these are mentioned earlier)
Tip on drawing ruffles, frills, and folds
Ruffles, frills, and folds are intricate designs that first with simple drawings.
However, every bit yous start, they become more challenging. You take to go on the cloth construction and fabric move in heed.
I am going to share my technique that would assistance y'all a lot.
- First, draw a curve. Under that bend line, draw a wriggly curve line.
- Add more wriggly lines like a ruffle.
- Add some straight lines for connecting the wriggly lines to the curved line for a frill look.
In that location you have it—a quick and like shooting fish in a barrel manner to draw ruffles.
Here is how y'all tin can draw 3 basic ruffles with this video.
Determination
With that beingness said, I hope you enjoyed learning nearly fourteen pro tips to draw dress. Good luck to you!

Source: https://jaejohns.com/how-to-draw-folds-in-clothes/
Posted by: alleynejustoll.blogspot.com
0 Response to "How To Draw Clothing On A Body"
Post a Comment